Data visualization is a powerful tool for communicating complex data. It presents it in a simple and easily understandable format. However, it is not enough to simply create a graph or chart and call it a day. To truly make use of information, it is important to create insightful reports. These reports effectively communicate the story behind the data.
Insightful reports help decision-makers understand key trends and patterns, identify areas of opportunity and make informed decisions. If analytics graphs and bar charts are only telling part of the story, it can lead people to wrong decisions.
Creating holistic and insightful reports requires the use of several data points. One tool that enables this is Microsoft Power BI.
What Is Microsoft Power BI?
Microsoft Power BI is a business intelligence tool. It allows you to connect many data sources to one dashboard. Using Power BI, you can easily model and visualize data holistically.
The platform has over 500 different data connectors. These connectors can tap into sources such as Salesforce, Excel, Azure and more. Users can leverage pre-built report templates to save time in creating data-rich reporting. Teams can also collaborate and share dashboards virtually.
Tips for Designing Great Data Visualization Reports
Getting started in Microsoft Power BI entails:
- Signing up for the software
- Connecting your data sources
- Using its tools to create report visualizations
Creating great reports goes beyond that. We will go through several tips and best practices for getting the most out of your Power BI output.
Consider Your Audience
You should design reporting dashboards with the end user in mind. What is it that this audience wants to see? Are they looking for bottom-line sales numbers? Do they want to cover insights that can help target productivity gaps?
The use of clear and concise language and effective visualizations are important. These help to highlight the key takeaways from the data. Customize reports to the audience’s level of technical expertise and business goals.
Don’t Overcomplicate Things
Many times, less is more. If you find that your dashboard looks crowded, you may be adding too many reports. The more you add means the more difficult it is to read the takeaways from the data.
Remove all but the most essential reports. Look for ways to include different data sets in a single report like using stacked bar charts. Dashboards should show important data at a glance so do your best to avoid the need to scroll.
Try Out Different Chart Types
Experiment with presenting your data in different ways. Flip between bar, pie and other types of charts to find the one that tells the story the best. When building a new dashboard for your organization, get some input. Ask those who will review the reports which chart type works best for them.
Get to Know Power Query
Power Query is a data preparation engine. It can save you a lot of time in developing insightful reports. This engine is used in Microsoft tools like Power BI and Excel.
Take time to learn how to leverage this tool for help with:
- Connecting a wide range of data sources to the dashboard
- Previewing data queries
- Building intuitive queries over many data sources
- Defining data size, variety and velocity
Build Maps with Hints to Bing
Bing and Power BI integrate which allows you to leverage default map coordinates. Use best practices to leverage the mapping power of Bing to improve your geo-coding.
For example, if you want to plot cities on a map, name your columns after the geographic designation. This helps Bing identify exactly what you are looking for.
Tell People What They Are Looking At
A typical comment heard often when presenting executives with a new report is, “What am I looking at?” Tell your audience what the data means by using features like tooltips and text boxes to add context.
Just one or two sentences can save someone 5-10 minutes of trying to figure out why you gave them this report. That context can get them to a decision faster. It also helps avoid any confusion or misunderstandings about the data.
Use Emphasis Tricks
People usually read left to right and from top to bottom. Put your most important chart at the top, left corner. Follow with the next most important reports.
If you have specific numbers that need to stand out, increase the font size or bold the text. This ensures that your audience understands the key takeaways.
You can also use colors to emphasize things like a “High, Mid, Low.” For example, a low level of accidents could be green, a mid-level in yellow and a high level colored red. This provides more visual context to the data.
Need Help with Power Bi or Other Microsoft Products?
We can help you get started or improve your use of Microsoft 365, Power BI and more. Give us a call today to schedule a chat about leveraging this powerful platform.
In today's fast-paced and digitalized world, efficient document handling is crucial for the smooth operation of any business. Printing is one of the most significant processes in document handling and Microsoft Universal Print is a cloud-based printing solution that can streamline this process and improve productivity.
In this article, we will explore in detail the benefits and how it can improve document handling for your office.
What is Microsoft Universal Print?
Microsoft Universal Print is a cloud-based printing solution that simplifies printing for both administrators and end-users. With Universal Print, you can manage printers and printer drivers from a single console in the cloud which eliminates the need for on-premises print servers. This makes it easier to deploy printers, manage printer drivers and configure printer settings across your organization.
4 Ways that Microsoft Universal Print Can Improve Document Handling for Your Office
Simplified Printing Management
Managing a printing infrastructure can be challenging when there are several printers and print drivers involved. Microsoft Universal Print simplifies printing management by enabling you to manage printers and printer drivers from a single console in the cloud. With Universal Print, you no longer need to manage on-premises print servers which reduces the complexity and cost of managing your printing infrastructure.
Improved Printing Security
Printing security is critical and Microsoft Universal Print uses Azure Active Directory (Azure AD) to authenticate users and secure print jobs. This means that only authorized users can print documents and print jobs are encrypted in transit and at rest. This improves the security of your printing infrastructure and reduces the risk of data breaches.
Greater Printing Flexibility
With Microsoft Universal Print, users can print from anywhere and on any device without the need for complex printer configurations or VPN connections. This improves productivity by allowing users to print from wherever they are and eliminates the need for IT staff to manage printer configurations on individual devices. Universal Print makes printing easy and efficient and allows users to focus on other important tasks.
Reduced Printing Costs
Managing a printing infrastructure can be expensive. However, Microsoft Universal Print can help reduce the costs associated with it. By eliminating the need for on-premises print servers, Universal Print can reduce the costs of managing your printing infrastructure.
Additionally, you can reduce printing costs by using features like print job redirection which allows you to send print jobs to the most cost-effective printer based on factors like location and paper type.
Getting Started with Microsoft Universal Print
If you are interested in implementing Microsoft Universal Print in your organization, here is how to get started:
Get an Azure Subscription
To use Microsoft Universal Print, you will need an Azure subscription (which is Microsoft's cloud computing service). You can sign up for an Azure subscription on the Azure website.
Find a Universal Print-Enabled Printer
You will also need a Universal Print-enabled printer. Several printer manufacturers like HP, Canon and Brother offer printers that are compatible with Universal Print.
Register your Printer
Once you have an Azure subscription and a Universal Print-enabled printer, you will need to register your printer with Universal Print. You can do this using the Microsoft 365 admin center or the Universal Print API.
Manage your Printer
After registering your printer with Universal Print, you can manage it from the Universal Print dashboard in the Microsoft 365 admin center. From here you can configure printer settings, manage printer drivers and monitor printer usage.
Printing for End-Users
End-users can then print to Universal Print-enabled printers from any device by selecting the Universal Print printer and the document they want to print. The print job is sent securely to the cloud and then to the printer.
Get Started Today
Microsoft Universal Print is a powerful cloud-based printing solution that can simplify printing management, improve printing security, increase printing flexibility and reduce printing costs for businesses of any size. With its ease of use and flexibility, Universal Print can be an essential tool for any organization looking to streamline their printing infrastructure.
If you are interested in implementing Microsoft Universal Print in your organization, it is essential to ensure that you have the necessary resources and expertise to make the most of this solution. You may need to work with a Microsoft partner or a third-party printing expert to ensure that your printing infrastructure is optimized for Universal Print.
When you are ready to learn more about Microsoft Universal Print and how it can improve document handling for your office, contact Sound Computers. Our team of experts can help you understand the benefits and provide guidance on how to implement this powerful solution in your organization. Get in touch with us today to learn more!
Scheduling appointments is a common activity. Salespeople often set up virtual appointments to answer questions about a product. Software companies allow people to schedule live demos. Telehealth therapists allow clients to book video sessions.
Those are just a few examples of some groups that are going to love a new Microsoft Teams feature. Virtual Appointments was recently added to the platform. It adds a new meeting style tailored for engagements with customers.
Have you been using Teams and a different online appointment app? This new feature will streamline the experience.
What Is Virtual Appointments in Teams?
Virtual Appointments gives you an all-in-one meeting platform for customer engagements. You can schedule, manage and conduct B2C meetings in Microsoft Teams.
This new feature brings together the scheduling component with the video conference interface. Anyone with the link can join the virtual appointment. They do not need a Teams account.
The power of Microsoft’s scheduling app, Bookings, connects to Teams. This makes the Virtual Appointments function as seamless as possible.
Some of the features below will be available with any Microsoft 365 plan. Some are available with a premium plan.
Teams Virtual Appointments Features
Manage Scheduled Appointments
You can see your scheduled appointments in a single view. Manage cancellations and time changes easily.
Send Customized Confirmations & Reminders
You can send customers a customized message via SMS or email. This personalizes the experience for them. You can also use automation to give that personal touch without needing to send each one manually. Automated appointment reminders are another time-saving function.
Customized Waiting Room
Add a personal touch to your virtual engagements. You can customize the Teams waiting room. You can use themes and logos to brand your business. You can also chat with attendees while in the lobby waiting room. This is helpful if your current appointment is running a little long. You can let them know that you will be right with them.
Meeting Follow-ups
You can send meeting follow-ups after a virtual appointment. This helps you reduce the time it takes to send any promised follow-up information. You also keep all details in a single place. This makes your client communication trail easier to follow.
Organization & Department Analytics
How effective are your appointments? It is hard to know if your demos are resulting in sales if you don’t have a good tracking system. It is also important to have visibility into customer appointments across the organization.
You can do this with a premium analytics feature. It gives you helpful reporting. The reporting provides insights into B2C virtual appointments in all departments.
How to Use Virtual Appointments
To start using Virtual Appointments in Teams, admins must set up a few things. Note that they must be a Bookings admin to access these settings.
Create a Calendar
In the Virtual Appointments app choose to “Create a calendar.” You can find this option on the Home tab.
Larger organizations may wish to create different calendars for different departments.
Add Staff
Add staff members. You can add up to 100. You will also need to assign them a role. Once you have added your staff, you can view their availability in both Teams and Outlook.
What is another nice thing about using an integrated platform like M365? It is the cross-app compatibility. Your calendar syncs across apps.
Create Appointment Types
You will next set up your appointment types. You can choose from these two options:
- Scheduled: You schedule the day/time. The system adds this information to the email confirmation.
- On-demand (Teams Premium): Customers can choose when to meet from your booking calendar.
Set Up SMS Notifications (If Desired)
If you choose to use SMS notifications and have the right Teams plan, you can set this up next. This allows you to easily send appointment confirmations and reminders via text message.
Note: Attendees currently need a valid U.S., Canadian or U.K. phone number to receive the SMS notifications.
Link Forms (If Desired)
If you would like your attendees to fill out any forms, you can link them now. Virtual Appointments allows linking up to four cloud-based forms. These would be forms you have created in Microsoft Forms.
Publish Your Booking Page
If you want to give customers the ability to book on-demand appointments, take this next step. You will need to publish the booking page. You do this on the “Manage” tab of Virtual Appointments. Select “Booking page” and turn on “Publish booking page.”
Get Help Using Your Microsoft 365 Tools More Effectively
Microsoft 365 is a platform with many possibilities. Often companies aren’t using all of the features that they could be using. As a result, their team may be less effective. They could also be wasting money on apps that they don’t need.
Are you interested in help supercharging your Microsoft 365 experience? Give us a call today to set up a meeting.

As technology continues to evolve, the workplace has seen an increase in the use of artificial intelligence (AI) to enhance efficiency, productivity and competitiveness. Microsoft’s recent introduction of “Copilot” is the latest and greatest innovation.
It is an AI-powered software tool aimed at automating repetitive tasks, improving collaboration and helping humans accomplish more without working overtime. Read on to learn about the key features and benefits of this new tool and how it may be able to improve your current workflow.
What is Microsoft 365 Copilot?
Copilot is Microsoft’s newest technology innovation that uses the power of AI and Natural Language Processing (NLP) to automate tasks in Microsoft 365 and beyond. You can think of this tool as a personal assistant. It can help you complete simple, repetitive tasks and can even take voice commands.
How It Works
Microsoft 365 Copilot uses machine learning algorithms in combination with Natural Language Processing (NLP). These technologies work together to help Copilot understand your data and generate relevant suggestions based on the patterns it identifies.
Microsoft trained the language model against billions of data points from Microsoft 365 and Microsoft Graph to make the tool more helpful for users who want to automate their tasks and improve productivity.
The main functionality of Copilot is that it works with you. Since the tool is integrated into Microsoft 365, it can speed up small, mundane actions like checking your schedule or deleting emails so you can focus on what matters.
How Can You Use Copilot With Microsoft 365?
Copilot was designed to integrate seamlessly with Microsoft 365 products. Here are some examples of how you can leverage this new tool to boost productivity while using your existing apps:
Outlook
With Copilot, you no longer need to spend hours clearing out your email inbox. Instead, your automated assistant will take care of it so you can direct your attention to more important tasks.
Excel
Filling out a spreadsheet can be exhausting and time-consuming. Copilot will help you populate your Excel spreadsheets from the relevant data within your other Microsoft 365 apps.
PowerPoint
When you get lost while trying to consolidate your notes for a brand-new PowerPoint presentation, you can ask Copilot to speed up the process for you by pulling information from saved documents.
Word
While Copilot may not be reliable for writing emails, blog posts and other documents all on its own, the tool can help you quickly generate a first draft that you can edit with full control before sending or publishing.
Teams
Copilot has extensive tools for collaboration which makes it more convenient for teams to communicate and easily schedule meetings that fit on everybody’s calendars.
Leveraging Business Chat For Better Collaboration
Business Chat is one of the most exciting new features introduced with Microsoft Copilot. It has the capability to respond to voice commands and pulls relevant data from emails, calendars, chats and documents to provide complete answers.
This feature is especially useful for managers, team leaders and other busy professionals who need to multitask or work hands-free.
For instance, supervisors can push out project status updates to multiple team members by speaking a voice command to Copilot. Similarly, the tool can schedule meetings for you by collecting the data from your team’s calendar and choosing the most optimal time.
In general, Business Chat can be used to send emails, create a to-do list or add something to a document along with many other small actions. It makes it much easier to stay organized at work by taking on time-consuming tasks and keeping track of multiple actions at once.
Why Should You Consider Microsoft 365 Copilot For Your Business?
Here are some of the benefits of using Microsoft 365 Copilot that you may want to consider:
Productivity and Creativity
In a typical work week, you may spend hours doing things like scheduling meetings, creating presentations and typing reports. Although these things are important, they can be completed in a fraction of the time with the help of automated tools like Copilot.
Copilot boosts productivity by saving you time doing mundane tasks so you can get twice as much work done. You can also focus your energy on more creative tasks like choosing design elements and improving visuals.
Personalization
Since Copilot uses the data stored in your Microsoft 365 apps, it can provide personalized suggestions when you ask a question or need a task completed. For instance, if you need to write a new email, it may use your previous communication and style preferences to suggest a relevant response.
Security and Privacy
When using any new software tool, security and privacy are always the first priority. Microsoft prioritizes security for all of its products and Copilot is no different.
All data accessed by Copilot is fully encrypted and subject to compliance and regulatory standards. You can rest assured that your sensitive details are monitored, controlled and stored within Microsoft’s secured data centers.
Need Guidance to Better Leverage Microsoft 365?
Get more out of Microsoft 365’s many productivity tools. Contact Sound Computers today. We will be happy to show you how to boost productivity digitally.
Microsoft 365 is one of the most popular cloud platforms in the world with about 345 million paid seats. Microsoft cloud tools numbers were up 32% in Q3 2022 compared to the previous year.
One of the reasons for its continued growth is the suite of cloud tools offered in the service. Users get a stable of over 20 different apps including the core MS Office suite.
With so many different apps, it is not uncommon for some to go unused. Companies may not even be aware that they have access to these other helpful tools. One of the handiest apps you get with a Microsoft 365 subscription is Microsoft Forms.
From sending year-end customer surveys to assessing change readiness, Forms makes it easy. This online survey and form-building tool has a lot to offer organizations. If you have a subscription to Microsoft 365, then you already get Forms included for free.
What Is Microsoft Forms?
Microsoft Forms is a drag-and-drop form, quiz and survey creator. It is simple to use and allows you to send out surveys via a link. Recipients can fill out your form online from any device.
Once recipients fill out the survey, the results come into the software instantly. You can see the collated results charted in the software. You can also export the results to Excel.
How to Get Started in Forms:
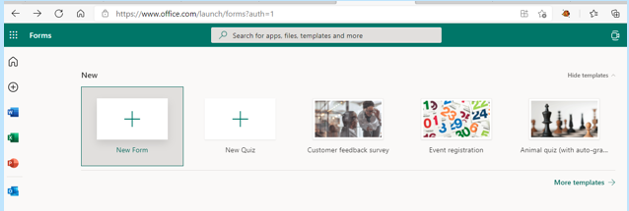
- Visit Forms.office.com and log into your Microsoft account.
- Choose “New Form” or “New Quiz" from the top menu
- OR you can choose to explore the built-in templates.
- Click “Add New” to add a new form field. You can choose from field types:
- Choice (i.e., multiple-choice question)
- Text
- Rating
- Date
- Ranking
- Likert (a scale that records attitudes/opinions about a topic)
- Net Promoter Score® (a scale from “not likely” to “extremely likely”)
- Section (separator that can include a title and image).
- Enter your questions.
- Once finished, click “Send” at the top. You can distribute the survey using the following options:
- Link to a web form
- QR code
- Embed in a web page
- Via Facebook or Twitter.
- View responses on the “Responses” tab.
Advantages of Using Microsoft Forms
It is Included in Microsoft 365 Subscriptions
If you already subscribe to Microsoft 365, it makes sense to use Forms. It can save you money if you’re using a separate survey tool like Survey Monkey. It is easily accessible by signing in with your Microsoft account.It Saves Time
Sending a survey by email is time-consuming. You need to worry about emails bouncing due to an attachment. You also need to spend time collating all the results as they come in.Using MS Forms can save you a lot of time. People don’t need to download anything or open an email file attachment. They simply follow your link and fill out the form online. As soon as they fill the survey out, you get the result. Forms also collates all the answers for you.
Get Charted Results Automatically
You can quickly see the results of the survey in meaningful graphs. Forms makes it simple to export to Excel if you want to upload the survey results into another platform.On the “Responses” tab, you can hover over the result graphs to see the details.
It is Easy to Use
There is a very low learning curve with Microsoft Forms. The interface is intuitive and simple so just about everyone can jump in and start using it.What Are Some Ways You Can Leverage Microsoft Forms?
Annual Customer Satisfaction Survey
Using a web-based survey can increase your response rate from customers. They can fill out your satisfaction survey from any device which makes it quick and easy for them.You can see results instantly. Then chart them to gain insights into what your business is doing right and what you can improve upon.
Employee Security Awareness Quiz
Send a security awareness quiz to your employees using Forms. It can be easily integrated into your cybersecurity awareness training. The platform also tells you the average response time per person.Change Readiness Survey
Change management is a growing focus of many organizations. This is due to the speed of technology-driven transitions. You can use Forms to improve user readiness for change adoption. Create and send out a change readiness survey to affected groups.Event Registrations
Are you hosting an event? You can easily gather registration details. Send out a Forms link via QR code, social media, text or email.Volunteer Registration Form
Embed an MS Forms registration form on your web page to sign up volunteers. The platform will automatically collate different talents or other volunteer information. This helps you better match people's talents to your needs.And More
You will find more ideas from the Forms templates such as:• Competitive analysis study
• Post-event feedback survey
• Office facility request form
• Employee satisfaction survey
• Product pricing survey
• Food catering request form
• Save the date form
• Course enrollment form
Would You Like to Get More Out of Microsoft 365?
There is a good chance that your company may be leaving some value on the table with M365. Give us a call today to learn more about our Microsoft 365 support services.
Virtual appointments have become increasingly popular since the start of the COVID-19 pandemic as remote working and online meetings have become the norm. Microsoft Teams is introducing a new feature that will make scheduling online meetings even easier: Virtual Appointments in MS Teams.
What are Virtual Appointments in MS Teams?
Virtual Appointments in MS Teams is a new feature that connects Microsoft Bookings with the Virtual Appointments feature in Teams. This integration allows businesses to use a scheduling calendar to book virtual appointments and meetings within the Teams platform.
Microsoft Bookings is a scheduling app that allows businesses to schedule and manage appointments with their customers. It integrates with other Microsoft applications (like Outlook and Teams) to make scheduling and organizing appointments easier.
The Virtual Appointments feature in Teams allows users to hold online meetings, webinars and video conferences. With the integration of Microsoft Bookings, businesses can now schedule and manage virtual appointments directly from Teams without needing to switch between multiple apps.
How does it work?
Businesses need to have both Microsoft Bookings and Teams. The integration of these two apps supports scheduling and managing appointments from within Teams.
The scheduling calendar in Bookings allows customers to view available appointments and book a time that works for them. When a customer books an appointment, it automatically appears in the Teams calendar and the host receives a notification.
When it is time for the appointment, the host and the customer can join the meeting from within Teams. The meeting can be held using video, audio or chat depending on the preferences of the host and the customer.
What are the Benefits of Virtual Appointments in MS Teams?
Virtual Appointments in MS Teams offer several benefits for businesses and customers including:
Streamlined Scheduling
Businesses can schedule and manage appointments directly from the Teams platform without needing to switch between multiple apps. This saves time and increases efficiency which makes scheduling appointments easier and more streamlined.
Improved Customer Experience
Virtual Appointments in MS Teams offer customers a seamless appointment scheduling and meeting experience. Customers can easily view available times and book appointments and they can join the meeting directly from Teams without needing to download any additional software.
Increased Productivity
Businesses can hold virtual appointments and meetings without needing to leave the Teams platform. This increases productivity and allows businesses to focus on what they do best.
More Flexibility
Virtual Appointments in MS Teams offer increased flexibility which makes it possible to schedule appointments and meetings from anywhere and at any time. This is especially important in today's remote working environment where businesses need to be flexible and adaptable.
How Can I Get Started With Virtual Appointments in MS Teams?
You first need to have both Microsoft Bookings and Teams. The following steps will help you set it up and start scheduling appointments:
Create a Scheduling Calendar in Bookings
Create a scheduling calendar in Bookings. This will allow customers to view available times and book appointments.
Connect Bookings to Teams
To connect Bookings to Teams, go to the Teams Admin Center and select "App Catalog". Then search for "Virtual Appointments.”
Install Virtual Appointments
Once the Virtual Appointments app is installed, you can configure it to work with your Bookings calendar.
Get Started With Virtual Appointments
The new Virtual Appointments feature makes it easier for businesses to schedule and manage virtual appointments and meetings directly from Teams. This integration offers several benefits from streamlined scheduling and improved customer experience to increased productivity and flexibility.
Virtual Appointments in MS Teams are particularly useful for businesses that rely on appointments and meetings to conduct their operations like healthcare providers, financial advisors and legal professionals. With the ability to hold virtual appointments and meetings directly from Teams, these businesses can continue to provide their services from anywhere.
Scheduling appointments and meetings remotely allows businesses to offer more flexibility to their customers. This can lead to increased customer satisfaction and loyalty which provides a much-needed edge on the competition in today’s competitive business landscape.
As businesses continue to adapt to remote working and online meetings, Virtual Appointments in MS Teams offer a convenient and efficient way to schedule and manage virtual appointments and meetings. At Sound Computers, we specialize in helping our business clients integrate Microsoft Bookings with Teams to create a more efficient workflow.
Contact us to learn more about our comprehensive IT services and the benefits that you and your customers can experience with Virtual Appointments in MS Teams. Give us a call anytime at (870) 577-8060 to get started today!
If you follow Microsoft products, you may know about Microsoft Ignite. It generates many exciting updates and announcements every year in the Microsoft world.
Microsoft held its most recent conference last October. In the rush of the recent holidays, you may have missed some of the highlights. So, we’re bringing them to you now.
One thing that you will notice is that Microsoft Teams got a lot of love at the event. Microsoft is now describing Teams as “the app at the center of Microsoft 365.” We can see why the company keeps enhancing this virtual workspace. Teams now has over 280 million users. It is not surprising because Microsoft has introduced over 450 new Teams features just in the last year.
We will go over some Teams features below along with other Microsoft App announcements from Ignite. These may give you some ideas for your next digital workflow upgrade.
Teams Premium
There is a new Teams Premium offering from Microsoft that adds a whole new AI component to the platform. This service includes several AI-powered features. They make it seem like you have your own meeting assistant.
Some of the cool features include automatically generating chapters from a Teams meeting. The app also generates personalized highlights for you. This saves you from having to rewatch the meeting later.
If you are meeting internationally, you can enjoy real-time translations for captions. Meeting guides is another new feature. It sets up your meeting options according to your needs.
360-Degree Intelligent Camera for Teams Meetings
SmartVision 60 is the first 360-degree, center-of-room intelligent camera. It has the ability to track the speaker as they are moving. The camera is also due to have a people recognition feature coming soon.
Virtual meetings can feel much more like real meetings using SmartVision 60. Instead of just seeing a small video feed of one person, the movement of the camera can capture a whole team.
Cisco is Now a Certified Devices Partner for Teams Rooms
Those that are fans of Cisco meeting products will be pleased to know that they now have more options. Microsoft announced that Cisco is now a Teams Room Certified Devices partner. You can now start Teams meetings across all certified Cisco meeting devices.
Microsoft Places
One of the virtual workspace apps to support the new hybrid movement is Microsoft Places. This is a team management app that integrates with the rest of the Microsoft 365 ecosystem.
The office is still around but for how long? Much of the world had to do things virtually during the pandemic. Many companies and employees found they like it better that way. Seventy-four percent of US companies have or plan to put in place a permanent hybrid work model.
Microsoft Places is one more way Microsoft is leading the hybrid office revolution. Some of the app’s features include:
- Manage and track where employees are working (at home or in the office).
- Track whether coworkers are away or available.
- Track physical room use to make strategic decisions.
Hours & Location Feature in Outlook & Teams
Another feature announcement related to the hybrid working world is hours and location. This is a new capability added to Teams and Outlook to make it easier to schedule in-person meetings.
It can get tricky to plan in-person meetings when you don’t know who is working at the office and who is remote. If you plan without checking, you're bound to alienate someone. They won't be happy if they were planning to work from home that day.
The new hours and location feature allows people to specify where they are working. They can adjust this from hour to hour. It takes the guesswork out of scheduling.
Loop App Private Preview
Another exciting app announcement that Microsoft made was about its Loop app. It stated that Loop entered private preview. This gives some organizations a chance to check it out.
Loop is a collaborative workspace app that helps teams ideate in a virtual space. All data pulled in from Microsoft 365 apps sync automatically to stay up to date.
Microsoft Clipchamp Video Editor
You may have noticed an unfamiliar app popping up on Windows. Microsoft Clipchamp was formally announced at the Ignite event. It is a quick and easy video editor for Windows PCs.
Have you ever felt frustrated trying to fix a video and not having the right tool to do it? Then you may want to take a closer look at what Clipchamp has to offer. It looks to have a fairly low learning curve.
Get Help Navigating the Microsoft 365 Universe
Microsoft 365 has come a long way in a short period. There are many different app integrations that you can use to power your workflow but it can get a bit complicated without an expert to help. Give us a call today to schedule a Microsoft consultation.
Microsoft 365 is the most popular of all major office productivity software. It has 48.8% of the global market share (just edging out Google’s apps by a couple of percentage points).
It is used by individuals, small & mid-sized businesses and larger enterprise organizations. It does everything that a modern office needs including word processing and spreadsheet work as well as cloud storage and video conferencing.
Microsoft 365 is a vast platform containing over 20 apps in total. It can be easy to miss helpful features. People tend to stick with what is familiar. This often causes them to miss out on time and money-saving bonuses in M365 beyond the core apps.
Some of the many apps that you get (depending on your subscription plan) include:
- Excel
- Word
- PowerPoint
- Outlook
- To Do
- OneDrive
- Teams
- Forms
- Defender
- SharePoint
- Yammer
- Lists
- Access
- Bookings
- Intune
- Planner
- Visio
Do you want to get more value from your subscription? We will go through some of the most helpful apps and features in Microsoft 365 that you may now know about.
Get More Out of M365 With These Tips
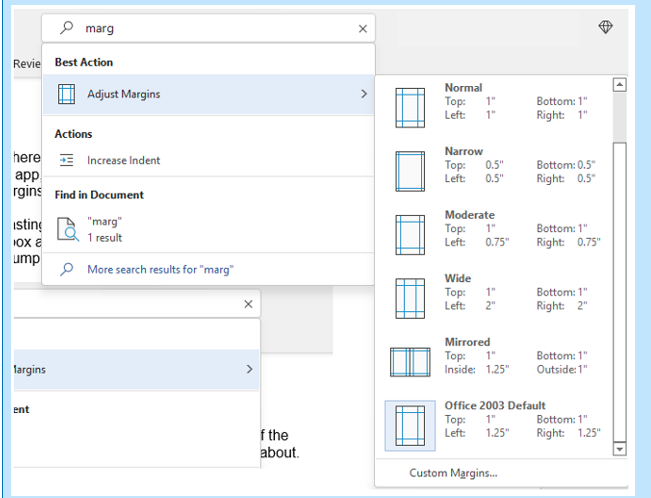
1. Skip the Menu Bar by Using Search to Find Functions
We have all been there at one time or another. You know there is a way to do something in an app but you can't find it in the menu. For example, you may be trying to change your margins in Microsoft Word to give you more space on the page.
You can stop wasting time clicking through one tab after another, and instead, use the search box at the top. It is not just for searching for help topics. You can use a search to quickly jump to settings like margins, page orientation, etc.
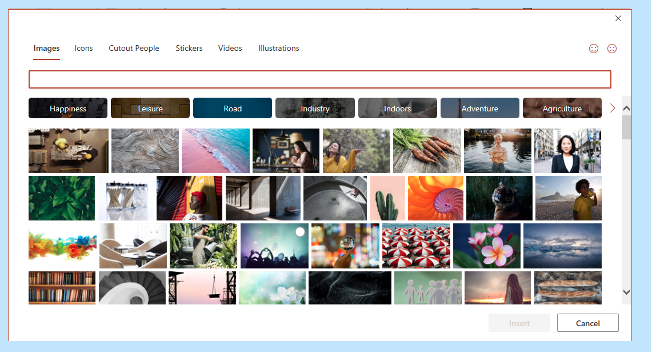
2. Leverage the Free Stock Images, Icons & Videos
Most businesses need to have nice-looking images from time to time. They’re used on websites, brochures and presentations. However, finding good business images can be expensive.
You can’t just do a Google search to find them because they may be copyrighted. You need to have images that you can use commercially without any problems.
Inside the Word, Excel and PowerPoint, you have a treasure trove of images. These are free to use in your marketing. You also have videos, icons and even 3D models there for the picking.
Find them by going to Insert > Pictures > Stock Images.
Use the tab at the top to tab between the different media. Click to insert it directly into your document, spreadsheet or presentation.
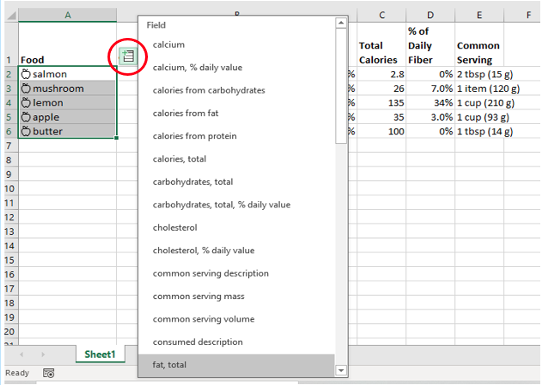
3. Save Time by Using Data Types in Excel
Researching things like the population of a city or the nutrition value of a new menu can take days. Did you know that inside Excel you have access to several databases?
You can leverage facts and figures stored inside Excel’s “data types." They include topics on everything from chemistry to yoga poses. Use data types to populate tons of data in seconds for various topics.
- Start by adding your list (e.g. a list of menu items).
- Highlight your list.
- Click the Data tab.
- In the Data Types window, choose the type of data it is (e.g., Food, Plant, etc).
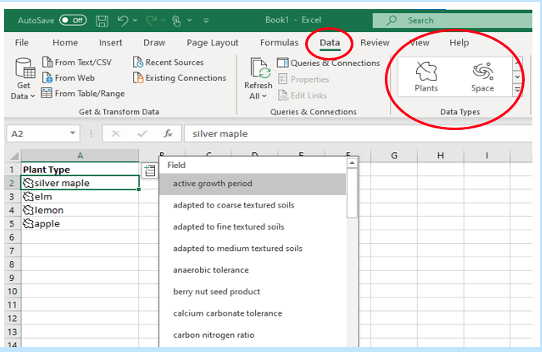
- Next, click the small database icon that appears at the top of the list.
- Choose the type of data you want.
- The details will populate into the next open column on the right for each list item.
4. Save Time on Customer Surveys with Microsoft Forms
Microsoft Forms is one of the best-kept secrets of M365. This cloud-based survey and form builder makes it simple to send out surveys to people. You get the results back as soon as they click “submit” on the cloud-based form.
You can even download the results directly to Excel. Then you can use them for graphing or upload them into a software template.
5. Use PPT’s Presenter Coach to Improve Your Skills
Do you worry when it comes time to give a presentation to clients or your own team? Not everyone feels comfortable about public speaking even when it is virtual.
PowerPoint can help with a handy AI-powered feature called Presenter Coach. Turn this coach on when practicing your presentation. It will give you tips on your pacing, use of filler words (e.g. umm), repetitive language and much more!
Look for the “Rehearse with Coach” option on the Slide Show menu.
6. Save Recurring Email Text in Outlook’s Quick Parts
Do you have certain emails you send to customers that have the same paragraphs of text in them? For example, it might be directions to your building or how to contact support.
Stop retyping the same info every time. Outlook has a feature called Quick Parts that saves and then inserts blocks of text into emails.
- Create a Quick Part by highlighting the text to save in an email.
- On the Insert menu, click Quick Parts.
- Save Quick Part.
When ready to insert that text into another email, just use the same menu. Then click to insert the Quick Part.

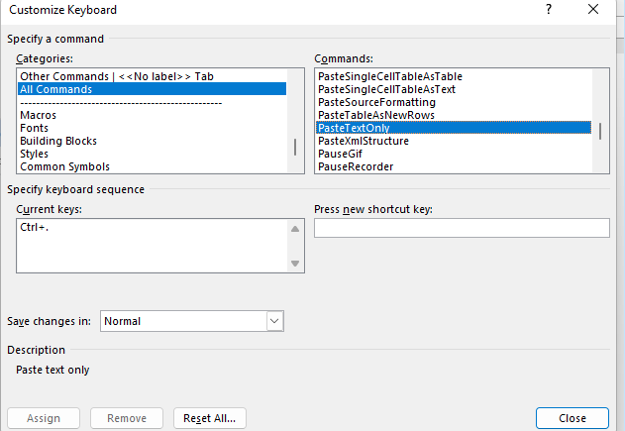
7. Create a Keyboard Shortcut to Paste as Unformatted Text
Keyboard shortcuts are great for saving time. However, there is not always one there when you need it. One handy keyboard shortcut to add for MS Word is to paste as text only. This method removes any formatting that copied text might have had so your document isn’t messed up.
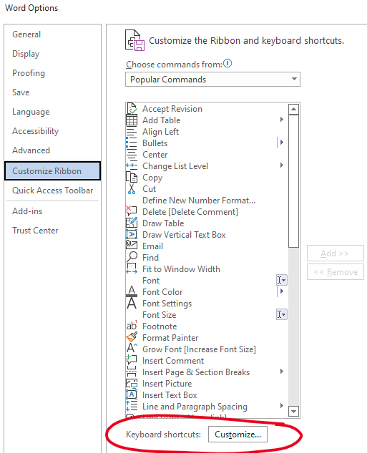
Here is how to make a keyboard shortcut for this:
- In Word, click File > Options.
- Click Customize Ribbon.
- At the bottom of the panel (next to Keyboard shortcuts) click Customize.
- Scroll in the left pane to All Commands.
- Look for “PasteTextOnly”.
- Type your keyboard command and click Assign.
Need Help Optimizing Microsoft 365?
Microsoft 365 has many security-enhancing, time-saving and dollar-saving features. Learn other ways that we can help by scheduling a consultation today. Give us a call at (860) 577-8060 or use our contact form.

When you hear about Microsoft adding security apps to M365, it is often the business versions. However, the pandemic has changed the way that we see the workplace. It is now a hybrid world made up of several connected “mini-offices” located in employee homes.
The outsourcing market has also contributed to the change in company networks. Freelancers are often contracted to work the same hours as employees. This means less overhead and taxes to pay. Approximately 68% of large consumer products companies outsource a part of their workforce.
What we’re getting at is that the need for home devices and network security has never been greater. Company data is now at the mercy of employee devices situated in homes across the globe.
55% of employees use their own devices and software to work from home.
Microsoft has been at the forefront of this huge shift in the work environment. Their latest release is another example of how it has positioned its products to address new needs.
The latest security offering by Microsoft is not for business plans. It is for Personal and Family users of Microsoft 365. The company announced Microsoft Defender for Individuals on June 16, 2022. This is a brand-new digital home security tool.
The Basics of Microsoft Defender for Individuals
Microsoft Defender is a new app that Microsoft 365 subscribers can download. Anyone with a Personal or Family plan can access it for no extra cost.
According to Microsoft, there was a main driver for offering Microsoft Defender. It was to protect the digital life of small businesses and families. Small companies will often use consumer Microsoft 365 plans. This is because they are less expensive than the business plans.
This app brings many digital protections together into one dashboard. These include the following.
Online Security Visibility
Most families have several devices connected to their network. This includes computers, tablets and smartphones. It can be hard to know which are vulnerable before a hacked device infects the others.
Microsoft Defender gives you visibility into the security status of your devices. It does this in a single place. For example, you could see if that new phone of Sally’s has antivirus enabled. You can also easily add or remove devices.
Device Safeguards
The app includes extra protections from online threats. These are in the form of help from antivirus and anti-phishing protection.
You can use it to continually scan devices for both new and existing threats. You also gain control of scanning customization. For example, you can note certain apps as safe and tell Microsoft Defender what to scan.
Real-Time Alerts & Recommendations
Hackers use automation and AI to unleash their attacks and help them spread. This means that it is often a race against the clock to stop a breach from getting worse.
You need to know something is wrong to be able to act quickly. Microsoft Defender helps you by giving you real-time alerts. These also come with recommended actions so that you know something is wrong and what to do about it.
What Else Should You Know?
Here are a few other important things you should know about using Microsoft Defender for Individuals.
Where Can You Download It?
You can download Microsoft Defender for Individuals from Microsoft here. You need to have a Microsoft 365 subscription to either the Personal or Family plan.
What Devices Can Use It?
You can use Defender to secure and monitor the following devices:
- Windows: Windows 10 version 19041.0 and higher
- Mac: Intel Macs from Catalina 10.15 and higher, and Apple silicon-based devices from 11.2.3 and up
- iPhone: iOS 13.0 or later
- Android: Android OS 6.0 or later
How Many Devices Can You Add?
Microsoft Defender allows you to watch the security of many of your home or work devices. The M365 plan you have will dictate how many.
- If you have the Microsoft 365 Personal plan, you can receive protection on up to 5 devices at the same time.
- If you have the Microsoft 365 Family plan, you can receive protection on up to 30 devices at the same time (5 devices per person, 6 people total).
What Are the Key Differences Between the Personal & Family Plans?
Both plans can access the many different Office and other Microsoft applications. The main difference is how many people and devices can use the Microsoft 365 services.
- Microsoft 365 Personal: $69.99 US/year, 1 person, 5 devices
- Microsoft 365 Family: $99.99 US/year, 6 people, 5 devices per person
If you want to sign up at least 2 people, you’re saving quite a bit with the Family plan. You save even more if you have six people total using the service.
What is the Difference Between Microsoft Security on Windows & Microsoft Defender?
Most Windows users are already familiar with the Microsoft Security app. It comes pre-installed on Windows. Microsoft Defender differs from this app in several ways.
Microsoft Defender:
- Is not pre-installed on Windows. You must download it.
- It is a cross-device application used on many different devices.
- It includes features for online security.
- It includes alerts and security tips.
Learn More About Defender & Microsoft 365 Today
Are you looking to get more from your Microsoft 365 subscription? We can help! Reach out today to schedule a technology consultation with our M365 experts. Give us a call at (860) 577-8060 or use our convenient contact form.